Customer Review Sentiment Analysis System Using Elasticsearch and Amazon Comprehend
Contents
- 1 Why Customer Review Sentiment Analysis Matters for Your Business
- 2 Architecture Overview
- 3 Step 1: Installing and Configuring Elasticsearch for Review Data
- 4 Step 2: Setting Up Kibana Dashboard for Customer Insights
- 5 Step 3: Creating Elasticsearch Index Schema for Review Analytics
- 6 Step 4: AWS Comprehend Setup for Automated Sentiment Detection
- 7 Step 5: Analyse Reviews Processing
- 8 Step 6: Building Advanced Kibana Visualizations for Customer Insights
- 9 Advanced Extensions and Next Steps
- 10 Conclusion
Why Customer Review Sentiment Analysis Matters for Your Business
Customer review sentiment analysis has become a critical competitive advantage in 2025. With over 93% of consumers reading online reviews before making purchases, businesses that effectively analyze customer feedback gain valuable insights into product performance, service quality, and market positioning.
In this tutorial, we’ll implement an automated elasticsearch sentiment analysis dahsboard with AWS Comprehend that processes thousands of customer reviews, detects sentiment patterns, and identifies toxic content—all while creating powerful visualizations for actionable business insights.
Architecture Overview
Our customer review sentiment analysis system integrates three powerful technologies:
- Amazon Comprehend: Performs advanced sentiment analysis, key phrase extraction, and toxic content detection on customer reviews using machine learning.
- Elasticsearch: Provides lightning-fast indexing, querying, and aggregation capabilities for processing thousands of reviews in real-time.
- Kibana: Delivers rich visualization and dashboard capabilities, transforming raw sentiment data into actionable business intelligence.
Step 1: Installing and Configuring Elasticsearch for Review Data
To begin, we’ll set up Elasticsearch on our local machine. This local setup is ideal for development and testing purposes.
- Download Elasticsearch:
- Visit the Elasticsearch download page and download the version that is compatible with the operating system.
- Install Elasticsearch:
- Follow the installation instructions provided for your OS. After installation, start the Elasticsearch service.
- Extract the files and navigate to the
bindirectory. - Start Elasticsearch by running
./elasticsearch(Linux/Mac) orelasticsearch.bat(Windows).
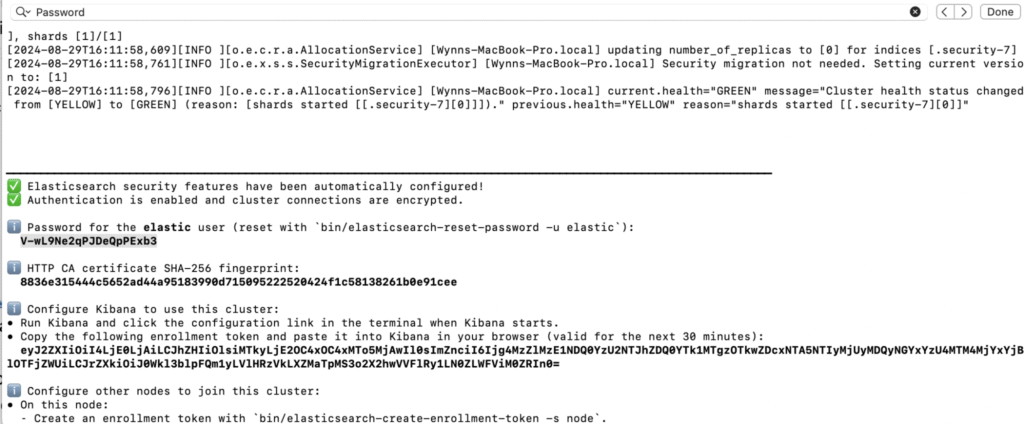
- Verify Installation:
- Open a web browser and go to
https://localhost:9200. We should see a JSON response indicating that Elasticsearch is running.
- Open a web browser and go to
Note that, Elasticsearch is secure by default in the latest version. You will be prompted to enter a username and password to access Elasticsearch.
Look up the installation console for the username and password.
Performance Optimization for Customer Review Processing
For elasticsearch sentiment analysis at scale, configure these performance settings in config/elasticsearch.yml:
# Optimize for customer review workloads
indices.memory.index_buffer_size: 20%
indices.fielddata.cache.size: 40%
thread_pool.write.queue_size: 1000
Step 2: Setting Up Kibana Dashboard for Customer Insights
This connection enables powerful customer review sentiment analysis visualizations.
- Download Kibana:
- Visit the Kibana download page and download the version that is compatible with the Elasticsearch installation.
- Install Kibana:
- Follow the installation instructions for your OS. Start the Kibana service once installed.
- Extract the files and navigate to the
bindirectory. - Start Kibana by running
./kibana(Linux/Mac) orkibana.bat(Windows).
- Access Kibana:
- Open a web browser and navigate to
http://localhost:5601. We should see the Kibana dashboard.
- Open a web browser and navigate to
- You will be prompted to enter the enrollment token, look up the token from the Elasticsearch installation console in Step 1.
Step 3: Creating Elasticsearch Index Schema for Review Analytics
Our elasticsearch customer review dashboard tutorial requires a properly structured index. An Elasticsearch index is like a database table where we store our data. Here, we’ll create an index to store customer reviews.
We’ll use Kibana’s Dev Tools to create the Elasticsearch index as Kibana provides a user-friendly interface for interacting with Elasticsearch:
- Open Kibana’s Dev Tools:
- Go to the Kibana dashboard and navigate to Dev Tools.
- Create an Index:
- In Dev Tools, enter the following command to create an index called
customer-reviews:
- In Dev Tools, enter the following command to create an index called
PUT /customer-reviews
{
  "mappings": {
    "properties": {
      "review_id": {
        "type": "keyword"
      },
      "product_id": {
        "type": "keyword"
      },
      "category_id": {
        "type": "keyword"
      },
      "product_name": {
        "type": "text",
        "analyzer": "review_analyzer",
        "fields": {
          "keyword": {
            "type": "keyword"
          }
        }
      },
      "review_text": {
        "type": "text",
        "analyzer": "review_analyzer"
      },
      "sentiment_score": {
        "type": "keyword"
      },
      "sentiment_confidence": {
        "type": "float"
      },
      "key_phrases": {
        "type": "keyword"
      },
      "toxicity_level": {
        "type": "keyword"
      },
      "toxicity_scores": {
        "type": "object",
        "properties": {
          "hate_speech": { "type": "float" },
          "harassment": { "type": "float" },
          "insult": { "type": "float" },
          "violence_threat": { "type": "float" }
        }
      },
      "timestamp": {
        "type": "date"
      },
      "rating": {
        "type": "integer"
      },
      "helpful_votes": {
        "type": "integer"
      }
    }
  }
}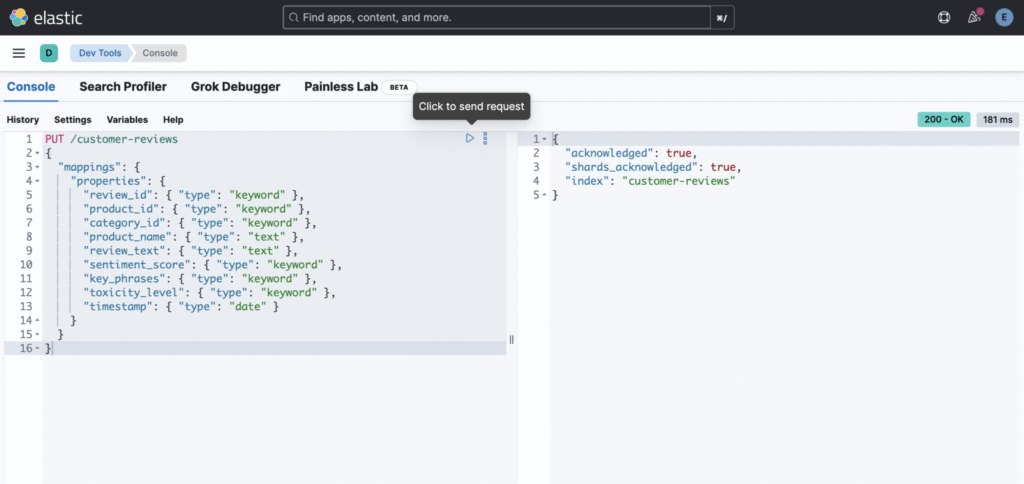
This index will store all the necessary details about each review, including the product ID, category, review text, sentiment, and more.
We can enhanced the schema by adding the following:
  "settings": {
    "number_of_shards": 2,
    "number_of_replicas": 1,
    "analysis": {
      "analyzer": {
        "review_analyzer": {
          "type": "custom",
          "tokenizer": "standard",
          "filter": ["lowercase", "stop", "stemmer"]
        }
      }
    }
  },
What are Shards? Think of shards as “filing cabinets” for your customer review data. Instead of putting all 100,000 reviews in one giant cabinet, Elasticsearch splits them across multiple smaller cabinets (shards).
"number_of_shards": 2means your review data is split into 2 pieces- Each shard can be stored on different servers for better performance
- Why 2 shards? For small to medium datasets (under 1 million reviews), 2 shards provide good performance without over-complicating things
What are Replicas? Replicas are “backup copies” of your data for safety and faster searches.
"number_of_replicas": 1means each shard has 1 backup copy- If your main server crashes, you still have your review data safe
- Multiple copies also mean faster search performance (users can search both the original and replica simultaneously)
What does this analyzer do? When someone writes a review like: “The Battery life is TERRIBLE and doesn’t last long!”
Here’s how review_analyzer processes it:
"tokenizer": "standard"- Splits text into individual words
- “The Battery life is TERRIBLE and doesn’t last long!” →
["The", "Battery", "life", "is", "TERRIBLE", "and", "doesn't", "last", "long"]
"lowercase"filter- Converts everything to lowercase for consistent searching
["The", "Battery", "life", "is", "TERRIBLE", "and", "doesn't", "last", "long"]→["the", "battery", "life", "is", "terrible", "and", "doesn't", "last", "long"]
"stop"filter- Removes common “stop words” that don’t add meaning (the, is, and, etc.)
["the", "battery", "life", "is", "terrible", "and", "doesn't", "last", "long"]→["battery", "life", "terrible", "doesn't", "last", "long"]
"stemmer"filter- Reduces words to their root form so variations match
["battery", "life", "terrible", "doesn't", "last", "long"]→["batteri", "life", "terribl", "doesn't", "last", "long"]
Step 4: AWS Comprehend Setup for Automated Sentiment Detection
Next, we’ll use Amazon Comprehend to perform sentiment analysis on the reviews and extract key phrases.
we need to configure our AWS credentials. This allows our script to access the Comprehend service.
- Install AWS CLI:
- Follow the instructions to install AWS CLI.
- Configure AWS CLI:
- Run
aws configurein our terminal and enter the AWS Access Key, Secret Key, region, and output format.
- Run
Step 5: Analyse Reviews Processing
We’ll write a Python script to handles large-scale customer review sentiment analysis, and then index the enriched data into Elasticsearch.
Navigate to your project directory and create a virtual environment:
cd /path/to/your/project
python3 -m venv path/to/venv
Activate the virtual environment using the following command:
source path/to/venv/bin/activateWith the virtual environment activated, install the necessary libraries:
pip3 install boto3 elasticsearch mysql-connector-pythonWrite the Script:
import mysql.connector
import json
import boto3
import pandas as pd
import logging
from elasticsearch import Elasticsearch
from elasticsearch.helpers import bulk
from botocore.exceptions import ClientError, BotoCoreError
from datetime import datetime
import time
import os
from dotenv import load_dotenv

load_dotenv()

logging.basicConfig(
    level=logging.INFO,
    format='%(asctime)s - %(levelname)s - %(message)s',
    handlers=[
        logging.FileHandler('review_analysis.log'),
        logging.StreamHandler()
    ]
)
logger = logging.getLogger(__name__)

class CustomerReviewAnalyzer:
    def __init__(self):
        """Initialize the customer review sentiment analysis system"""
        self.es = Elasticsearch(
            ['http://localhost:9200'],
            basic_auth=(os.getenv('ES_USERNAME'), os.getenv('ES_PASSWORD'))
        )
        self.comprehend = boto3.client(
            'comprehend',
            region_name=os.getenv('AWS_REGION', 'us-east-1')
        )

        self.db_config = {
            "host": os.getenv('DB_HOST'),
            "user": os.getenv('DB_USER'),
            "password": os.getenv('DB_PASSWORD'),
            "database": os.getenv('DB_NAME'),
            "pool_size": 10
        }

    def fetch_reviews_batch(self, batch_size=100, offset=0):
        """Fetch customer reviews in optimized batches for processing"""
        try:
            connection = mysql.connector.connect(**self.db_config)
            cursor = connection.cursor(dictionary=True)

            query = """
            SELECT review_id, product_id, category_id, product_name,
                   review_text, rating, helpful_votes, timestamp
            FROM reviews
            WHERE LENGTH(review_text) > 10
            ORDER BY timestamp DESC
            LIMIT %s OFFSET %s
            """

            cursor.execute(query, (batch_size, offset))
            reviews = cursor.fetchall()

            cursor.close()
            connection.close()

            logger.info(f"Fetched {len(reviews)} reviews from database")
            return reviews

        except mysql.connector.Error as e:
            logger.error(f"Database connection error: {e}")
            return []

    def analyze_sentiment_with_comprehend(self, text):
        """
        Advanced AWS Comprehend sentiment analysis with toxicity detection
        This is the core of our aws comprehend toxic content detection tutorial
        """
        try:
            # Truncate text if it exceeds Comprehend limits (5000 UTF-8 bytes)
            if len(text.encode('utf-8')) > 4500:
                text = text[:4500]

            # Sentiment Analysis
            sentiment_response = self.comprehend.detect_sentiment(
                Text=text,
                LanguageCode='en'
            )

            sentiment = sentiment_response['Sentiment']
            confidence_scores = sentiment_response['SentimentScore']

            # Key Phrase Extraction
            keyphrase_response = self.comprehend.detect_key_phrases(
                Text=text,
                LanguageCode='en'
            )
            key_phrases = [phrase['Text'] for phrase in keyphrase_response['KeyPhrases'][:10]]

            # Toxic Content Detection (Advanced Feature)
            try:
                toxic_response = self.comprehend.detect_toxic_content(
                    TextSegments=[{'Text': text}],
                    LanguageCode='en'
                )

                labels = toxic_response['ResultList'][0]['Labels']

                # Extract toxicity scores for detailed analysis
                toxicity_scores = {
                    'hate_speech': next((l['Score'] for l in labels if l['Name'] == 'HATE_SPEECH'), 0),
                    'harassment': next((l['Score'] for l in labels if l['Name'] == 'HARASSMENT_OR_ABUSE'), 0),
                    'insult': next((l['Score'] for l in labels if l['Name'] == 'INSULT'), 0),
                    'violence_threat': next((l['Score'] for l in labels if l['Name'] == 'VIOLENCE_OR_THREAT'), 0)
                }

                # Determine overall toxicity level with confidence thresholds
                max_score = max(toxicity_scores.values())
                if max_score > 0.7:
                    toxicity_level = 'High Risk'
                elif max_score > 0.5:
                    toxicity_level = 'Moderate Risk'
                elif max_score > 0.3:
                    toxicity_level = 'Low Risk'
                else:
                    toxicity_level = 'Non-Toxic'

            except ClientError as e:
                logger.warning(f"Toxicity detection failed: {e}")
                toxicity_level = 'Unknown'
                toxicity_scores = {}

            return {
                'sentiment': sentiment,
                'sentiment_confidence': max(confidence_scores.values()),
                'key_phrases': key_phrases,
                'toxicity_level': toxicity_level,
                'toxicity_scores': toxicity_scores
            }

        except ClientError as e:
            if e.response['Error']['Code'] == 'TextSizeLimitExceededException':
                # Handle oversized text by truncating further
                return self.analyze_sentiment_with_comprehend(text[:3000])
            else:
                logger.error(f"AWS Comprehend error: {e}")
                return self.get_default_analysis()

        except Exception as e:
            logger.error(f"Unexpected error in sentiment analysis: {e}")
            return self.get_default_analysis()

    def get_default_analysis(self):
        """Return default analysis when AWS Comprehend fails"""
        return {
            'sentiment': 'NEUTRAL',
            'sentiment_confidence': 0.0,
            'key_phrases': [],
            'toxicity_level': 'Unknown',
            'toxicity_scores': {}
        }

    def bulk_index_to_elasticsearch(self, processed_reviews):
        """Efficiently bulk index processed reviews to Elasticsearch"""
        actions = []

        for review in processed_reviews:
            action = {
                "_index": "customer-reviews-v2",
                "_id": review['review_id'],
                "_source": review
            }
            actions.append(action)

        try:
            # Use bulk helper for efficient indexing
            success, failed = bulk(self.es, actions, chunk_size=100)
            logger.info(f"Successfully indexed {success} reviews, failed: {len(failed)}")
            return success

        except Exception as e:
            logger.error(f"Elasticsearch bulk indexing error: {e}")
            return 0

    def process_reviews_pipeline(self, batch_size=50):
        """
        Complete pipeline for customer review sentiment analysis
        Processes reviews in batches to optimize AWS API usage and costs
        """
        offset = 0
        total_processed = 0

        while True:
            # Fetch batch of reviews
            reviews = self.fetch_reviews_batch(batch_size, offset)

            if not reviews:
                logger.info("No more reviews to process")
                break

            processed_reviews = []

            # Process each review with sentiment analysis
            for review in reviews:
                try:
                    # Perform comprehensive sentiment analysis
                    analysis = self.analyze_sentiment_with_comprehend(review['review_text'])

                    # Enrich review data with analysis results
                    enriched_review = {
                        **review,
                        'sentiment_score': analysis['sentiment'],
                        'sentiment_confidence': analysis['sentiment_confidence'],
                        'key_phrases': analysis['key_phrases'],
                        'toxicity_level': analysis['toxicity_level'],
                        'toxicity_scores': analysis['toxicity_scores'],
                        'processed_timestamp': datetime.utcnow().isoformat()
                    }

                    processed_reviews.append(enriched_review)

                    # Rate limiting to avoid AWS API throttling
                    time.sleep(0.1)

                except Exception as e:
                    logger.error(f"Failed to process review {review.get('review_id')}: {e}")
                    continue

            # Bulk index to Elasticsearch
            indexed_count = self.bulk_index_to_elasticsearch(processed_reviews)
            total_processed += indexed_count

            logger.info(f"Processed batch: {len(processed_reviews)} reviews, Total processed: {total_processed}")

            offset += batch_size

            # Optional: Add delay between batches for large datasets
            if batch_size > 100:
                time.sleep(1)

        return total_processed

# Production usage example
def main():
    """Main execution function for customer review sentiment analysis"""
    analyzer = CustomerReviewAnalyzer()

    logger.info("Starting customer review sentiment analysis pipeline")

    try:
        total_processed = analyzer.process_reviews_pipeline(batch_size=25)
        logger.info(f"Pipeline completed successfully. Total reviews processed: {total_processed}")

    except Exception as e:
        logger.error(f"Pipeline failed with error: {e}")

if __name__ == "__main__":
    main()
We can set up a cron job or a scheduled task to run this script periodically to keep our Elasticsearch index updated with the latest reviews from the database.
The processed review data, now containing sentiment scores, key phrases, and toxicity levels, is indexed in Elasticsearch.
The reviews are stored in an index called customer-reviews with defined mappings for each field:
...

{
  "_index": "customer-reviews",
  "_id": "2",
  "_score": 1,
  "_source": {
    "review_id": "2",
    "product_id": "123",
    "category_id": "phones",
    "product_name": "SuperPhone X",
    "review_text": "Not satisfied with the battery life. It doesn't last a full day with heavy usage.",
    "timestamp": "2024-08-02T15:30:00",
    "sentiment_score": "NEGATIVE",
    "key_phrases": [
      "the battery life",
      "a full day",
      "heavy usage"
    ],
    "toxicity_level": "Non-Toxic"
  }
},

...
Step 6: Building Advanced Kibana Visualizations for Customer Insights
Integrating Kibana with Elasticsearch to visualize the data is a key part of this setup. Now that our data is indexed in Elasticsearch, we can use Kibana to create visualizations that help us understand customer reviews.
Create Index Pattern for Customer Review Dashboard
- Navigate to Management > Stack Management > Index Patterns in Kibana
- Click Create index pattern
- Enter
customer-reviewsas the index pattern name - Select
timestampas the time filter field to enabled the time-based analysis - Click Create index pattern
Explore Data in Kibana:
- Go to Discover in the Kibana sidebar.
- Select your index pattern (
customer-reviews) from the dropdown menu. - You should see a list of documents (reviews) that you indexed into Elasticsearch.
- Use the search bar to filter and explore the data, such as searching for specific sentiments, products, or key phrases.
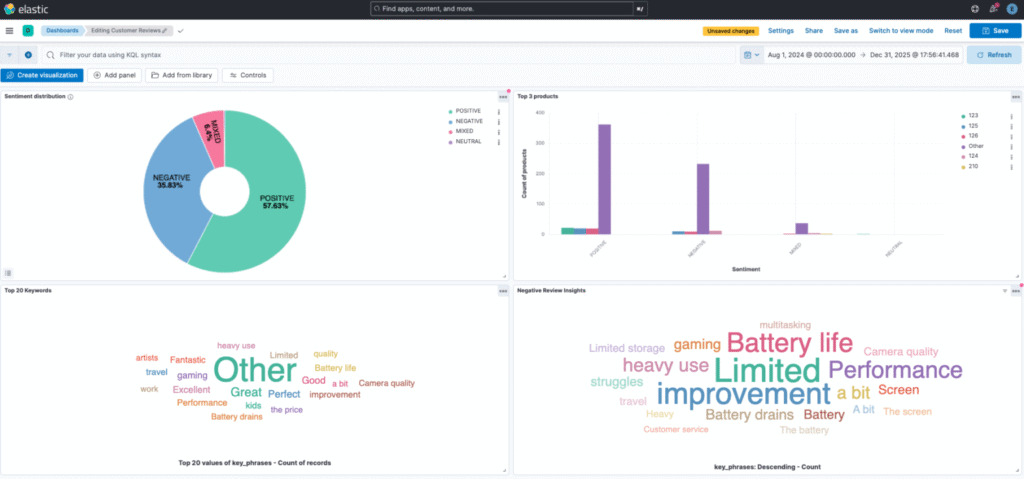
Essential Visualizations for Customer Review Sentiment Analysis
We can create several visualizations to gain insights into the reviews.
1. Real-time Sentiment Distribution Dashboard
Monitor overall customer satisfaction trends in real-time
- Go to Visualize Library > Create visualization > Aggregation based > Pie.
- Select
customer-reviewsindex pattern - In the Buckets section, we should be able to add a bucket.
- Click on Add Bucket.
- Select Split Slices, you should see options for aggregations.
- Under the Aggregation dropdown, select Terms.
- In the Field dropdown, select the sentiment field
sentiment_score.
This visualization instantly shows the distribution of positive, negative, and neutral sentiment across all customer reviews.
2. Product Performance Analysis
Identify which products receive the most positive or negative feedback
- Go to Visualize Library > Create visualization > Aggregation based > Vertical Bar.
- Select our
customer-reviewsindex pattern - In the Y-Axis, choose a metric like Count.
- Click on Add Bucket.
- Select X-Axis.
- In the X-Axis, choose Terms aggregation and set Field to
sentiment_score. - Click on Add Bucket
- Select Split Series
- Under the sub-aggregation dropdown, select Terms.
- In the Field dropdown, select the sentiment field
product_id. - Set the size to 5. (top 5 products)
3. Toxicity Detection Monitoring
Track and alert on toxic content in customer reviews (key feature of our aws comprehend toxic content detection tutorial)
- Go to the Discover section in Kibana to view raw data from your
customer-reviewsindex. - Add Filter: Click on the “Add filter” button.
- Configure Filter:
- Field: Select
sentiment_score. - Operator: Choose “is”.
- Value: Enter “NEGATIVE” or equivalent based on your sentiment scoring.
- Field: Select
- Save the filter to view only the negative reviews.
4. Key Phrase Analysis
Discover what customers are talking about most frequently
- Go to Visualize Library and create a new visualization.
- Choose a visualization type like a Tag Cloud.
- Bucket Aggregation:
- Add Tags, and select Terms as the aggregation.
- Set the field to
key_phrases.
- Metrics:
- Set the metric to “Count” to show the frequency of each key phrase in negative reviews.
- Adjust the visualization settings to focus on the most frequent key phrases.
By focusing on negative reviews and analyzing the associated key phrases, we can gain actionable insights that help improve customer satisfaction and address specific areas that need attention.
Advanced Extensions and Next Steps
1. Multi-language Review Analysis
We can extend the analyser for multiple languages:
def detect_language_and_analyze(self, text):
    language_response = self.comprehend.detect_dominant_language(Text=text)
    dominant_language = language_response['Languages'][0]['LanguageCode']

    # Analyze in detected language
    return self.analyze_sentiment_with_comprehend(text, language_code=dominant_language)
2. Real-time Alert Systems
We can set up alerts for negative sentiment spikes:
def check_sentiment_alerts(self, threshold=0.3):
    negative_ratio = self.get_recent_negative_ratio()
    if negative_ratio > threshold:
        self.send_alert(f"Negative sentiment spike detected: {negative_ratio:.2%}")
Conclusion
In this tutorial, we’ve set up a comprehensive customer review sentiment analysis system using Elasticsearch and AWS Comprehend. We performed sentiment analysis, extracted key phrases, and detected toxic content.
This elasticsearch customer review dashboard tutorial provides you with:
- Production-ready sentiment analysis pipeline processing thousands of reviews automatically
- Advanced toxicity detection keeping your platform safe from harmful content
- Real-time Kibana dashboards for immediate business insights