JWT Authentication in Django REST Framework Tutorial with SimpleJWT
Contents
- 1 Introduction
- 2 What is JWT and Why Use It?
- 3 Why Use JWT Instead of Sessions?
- 4 JWT Authentication Flow in Django REST Framework
- 5 Security Considerations
- 6 Prerequisites
- 7 Step 1 – Install Django SimpleJWT
- 8 Step 2 – Configure Django REST Framework
- 9 Step 3 – Implement JWT Login and Refresh Tokens in Django (SimpleJWT)
- 10 Step 4 – Test JWT Login with cURL and Postman
- 11 Step 5 – Protecting Django API Endpoints with JWT Permissions
- 12 Step 6 – Configuring Token Lifetime in Django SimpleJWT
- 13 Step 7 – Advanced Usage (Custom Claims & Blacklisting)
- 14 Automated Testing for JWT Authentication
- 15 FAQs on Django JWT Authentication
- 16 Conclusion
Introduction
In this JWT Authentication in Django REST Framework tutorial, we’ll implement a complete Django SimpleJWT setup for login, refresh tokens, permissions, and logout
You’ll learn how JWT (JSON Web Token) works, why it’s preferred over traditional sessions, and how to implement it step by step in Django. We’ll cover login with JWT tokens, token refresh, protecting endpoints with permissions, and logout with token blacklisting.
By the end, you’ll have a secure, production-ready Django JWT authentication setup.
What is JWT and Why Use It?
JWT (JSON Web Token) is a secure, compact way of representing identity between a client and a server.
It’s simply a string with three parts, separated by dots (.):
header.payload.signatureExample JWT (shortened):
eyJhbGciOiJIUzI1NiIsInR5cCI6IkpXVCJ9.
eyJ1c2VyX2lkIjoxLCJ1c2VybmFtZSI6ImFkbWluIiwiaWF0IjoxNjkwMDAwMDAsImV4cCI6MTY5MDAwMzAwfQ.
abc123signature
Let’s break it down:
- Header – tells us which algorithm was used to sign the token (e.g., HS256).
{ "alg": "HS256", "typ": "JWT" } - Payload – contains the actual user claims (user ID, username, roles, expiry).
{ "user_id": 1, "username": "admin", "exp": 1700000000 } - Signature – ensures integrity.
- The header + payload are signed with a secret key.
- If anyone tampers with the token, the signature check fails.
Because of this signature check, JWTs are tamper-proof: you can read them (they’re just Base64 encoded), but you cannot modify them without invalidating the token.
Why Use JWT Instead of Sessions?
| Feature | Sessions | JWT (Stateless) |
|---|---|---|
| Storage | Server must store session data | No storage needed (self-contained token) |
| Scaling | Hard (needs sticky sessions / Redis) | Easy (just validate signature) |
| Cross-platform use | Tied to browsers / cookies | Works with mobile apps, APIs, microservices |
| Security model | Server invalidates session on logout | Tokens live until expiry unless blacklisted |
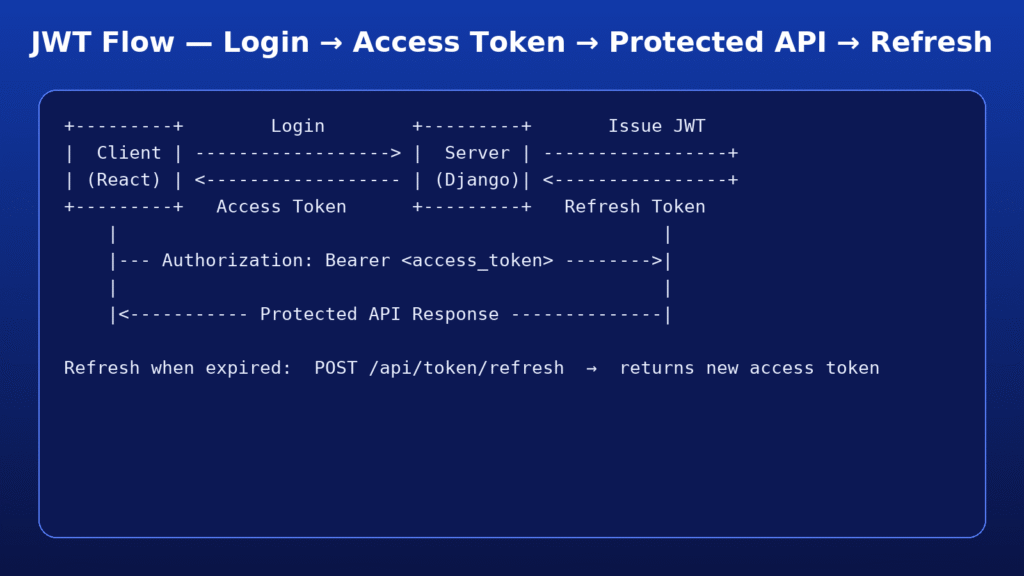
JWT Authentication Flow in Django REST Framework
- Login → User submits username + password.
- Token Issued → Django returns two tokens:
- Access Token (short-lived, e.g., 5–30 min)
- Refresh Token (long-lived, e.g., 7 days)
- Access Protected API → Client sends
Authorization: Bearer <access_token>. - Verify Signature → Django checks token validity (no DB lookup).
- Refresh → If the access token expires, client uses the refresh token to get a new one.
+---------+        Login        +---------+       Issue JWT
|  Client | ------------------> |  Server | -----------------+
| (React) | <------------------ | (Django)| <----------------+
+---------+   Access Token      +---------+   Refresh Token
    |                                                  |
    |--- Authorization: Bearer <access_token> -------->|
    |                                                  |
    |<----------- Protected API Response --------------|
Security Considerations
- JWTs are not encrypted by default → anyone can decode them.
- Never put passwords or sensitive data inside the payload.
- Always use HTTPS so tokens are not leaked over insecure connections.
- Prefer short-lived access tokens + refresh tokens for balance between security and usability.
Prerequisites
- Python 3.10+ installed
- Django 4.x or later
- A working Django project (or create one with
django-admin startproject myproject) - Basic knowledge of Django apps, views, and URLs
Step 1 – Install Django SimpleJWT
We need two key libraries:
- SimpleJWT – provides JWT authentication classes and endpoints (login, refresh, blacklist).
- Django REST Framework (DRF) – adds API support to Django (serializers, viewsets, permissions, authentication system).
pip install djangorestframework
pip install djangorestframework-simplejwt
djangorestframework-simplejwt is a third-party library that integrates JWT with DRF.
It gives us:
- Token issue & refresh endpoints
- Access & refresh token handling
- Customization for token lifetime and claims
- Optional support for blacklisting tokens (logout functionality)
Step 2 – Configure Django REST Framework
Open settings.py and update INSTALLED_APPS:
INSTALLED_APPS = [
    ...
    'rest_framework',
    'rest_framework_simplejwt',
]rest_framework→ activates Django REST Framework globally.rest_framework_simplejwt→ makes JWT classes and views available (likeTokenObtainPairView).
Without adding them here, Django won’t detect the apps and you’ll get ModuleNotFoundError.
Here we are telling DRF to use JWTAuthentication globally. That means every API request will look for a valid JWT token in the Authorization header.
In settings.py, configure DRF’s default authentication:
REST_FRAMEWORK = {
    'DEFAULT_AUTHENTICATION_CLASSES': (
        'rest_framework_simplejwt.authentication.JWTAuthentication',
    ),
}DEFAULT_AUTHENTICATION_CLASSES→ tells DRF how to authenticate requests.JWTAuthentication→ looks for a token in theAuthorizationheader, verifies it, and attaches the correspondingUserto the request.
Step 3 – Implement JWT Login and Refresh Tokens in Django (SimpleJWT)
In urls.py, include the built-in views from SimpleJWT:
from django.urls import path
from rest_framework_simplejwt.views import (
    TokenObtainPairView,
    TokenRefreshView,
)

urlpatterns = [
    # Login – get access + refresh tokens
    path('api/token/', TokenObtainPairView.as_view(), name='token_obtain_pair'),

    # Refresh – get new access token using refresh token
    path('api/token/refresh/', TokenRefreshView.as_view(), name='token_refresh'),
]
1. /api/token/ → Login
- Takes a username + password.
- Returns two tokens:
- Access Token (short-lived, e.g., 5–30 minutes)
- Refresh Token (long-lived, e.g., 7 days or more)
POST /api/token/
{
  "username": "admin",
  "password": "password123"
}
2. /api/token/refresh/ → Refresh Access Token
- Returns a new access token.
- Takes a refresh token.
POST /api/token/refresh/
{
  "refresh": "refresh_token_here"
}
Why Do We Need Two Tokens?
This is one of the most common confusions for beginners.
- Access Token →
- Short lifespan (5–30 min).
- Used in every API request.
- If stolen, the damage window is small.
- Refresh Token →
- Long lifespan (days or weeks).
- Used only to get a new access token.
- Should be stored securely (prefer HttpOnly cookies).
Without refresh tokens, users would need to log in every 5 minutes once the access token expires.
With refresh tokens, you can keep the session alive without re-entering username/password.
This two-token strategy balances security and usability.
Step 4 – Test JWT Login with cURL and Postman
Quick start:
python -m venv .venv && source .venv/bin/activatepip install -r requirements.txt- python manage.py makemigrations
python manage.py migrate && python manage.py createsuperuserpython manage.py runserver- Endpoints:
POST /api/token/(login: access+refresh)POST /api/token/refresh/(rotate refresh → new access)POST /api/logout/(blacklist refresh; requires auth)GET /api/protected/(demo protected)GET /api/posts/(public list)POST /api/posts/create/(auth create)GET|PUT|DELETE /api/posts/<id>/(owner or admin)
Make a POST request to /api/token/ with valid credentials:
curl -X POST http://127.0.0.1:8000/api/token/ \
  -H "Content-Type: application/json" \
  -d '{"username":"admin","password":"password123"}'
Response:
{
  "refresh": "refresh_token_here",
  "access": "access_token_here"
}
Now you can call APIs with this header:
Authorization: Bearer access_token_hereExample with curl:
curl -H "Authorization: Bearer <access_token>" \
     http://localhost:8000/api/posts/
Step 5 – Protecting Django API Endpoints with JWT Permissions
Authentication tells us who the user is. Permissions decide what that user can do. Think of it like this:
- Authentication = “You are Alice.”
- Permissions = “Alice can only edit her own posts, but Bob (admin) can edit any post.”
Blog API Example with Permissions
We’ll continue with our Blog API (from earlier).
Public Endpoint – Anyone Can Read
from rest_framework import generics
from rest_framework.permissions import AllowAny
from .models import Post
from .serializers import PostSerializer

class PostListView(generics.ListAPIView):
    queryset = Post.objects.all()
    serializer_class = PostSerializer
    permission_classes = [AllowAny]   # No auth required
Use Case: Blog homepage where anyone can see posts.
Authenticated Users – Can Create Posts
from rest_framework.permissions import IsAuthenticated

class PostCreateView(generics.CreateAPIView):
    queryset = Post.objects.all()
    serializer_class = PostSerializer
    permission_classes = [IsAuthenticated]

    def perform_create(self, serializer):
        serializer.save(author=self.request.user)
Use Case: Only logged-in users can publish posts.perform_create ensures the author = logged-in user, not someone else.
Owner or Admin – Can Edit/Delete Posts
from rest_framework.permissions import BasePermission, IsAdminUser

class IsOwner(BasePermission):
    def has_object_permission(self, request, view, obj):
        return obj.author == request.user

class PostDetailView(generics.RetrieveUpdateDestroyAPIView):
    queryset = Post.objects.all()
    serializer_class = PostSerializer
    permission_classes = [IsOwner | IsAdminUser]   # Owner OR admin
👉 Use Case:
- Alice can edit/delete her own posts.
- Admin can edit/delete any post.
- Other users cannot touch Alice’s posts.
Built-in Permission Classes (with Scenarios)
- AllowAny
Anyone can access (no auth needed).
Use for public APIs (homepage, signup). - IsAuthenticated
Only logged-in users.
Use for dashboards, creating posts, profile pages. - IsAdminUser
Only staff users (is_staff=True).
Use for admin APIs, content moderation. - IsAuthenticatedOrReadOnly
- Anonymous users → can only read (
GET,HEAD,OPTIONS)Authenticated users → can write (POST,PUT,DELETE)
- Anonymous users → can only read (
Combining Permissions
DRF allows logical operators:
permission_classes = [IsOwner | IsAdminUser]  # OR
permission_classes = [IsOwner & IsAuthenticated]  # AND
Example:
IsOwner | IsAdminUser→ Either owner OR admin can edit.IsOwner & IsAuthenticated→ Must be logged in AND be the owner.
This gives flexibility to express real-world access rules.
Global Default Permission
Instead of repeating IsAuthenticated everywhere, set a global default in settings.py:
REST_FRAMEWORK = {
    'DEFAULT_PERMISSION_CLASSES': [
        'rest_framework.permissions.IsAuthenticated',
    ]
}
- Now all views require authentication by default.
- Override with
AllowAnyfor public endpoints (like signup/login).
This ensures you never accidentally leave an API unprotected.
Step 6 – Configuring Token Lifetime in Django SimpleJWT
JWTs are stateless — once issued, they remain valid until they expire.
That means:
- If a token is stolen, an attacker can use it until it expires.
- Unlike sessions, you can’t just delete it from the database (unless you implement blacklisting).
This makes expiry time critical for balancing security and usability.
Access Token Lifetime
The access token should be short-lived.
- Common values: 5 minutes (very strict) to 30 minutes (balanced).
- If stolen, the attacker has only a small window to exploit it.
- But if it’s too short, users will be forced to refresh too often.
Refresh Token Lifetime
The refresh token has a longer lifespan.
- Common values: 7 days, 14 days, or even 30 days.
- Used only to request a new access token.
- Should be stored securely (e.g., HttpOnly cookie).
By default, access tokens last 5 minutes. You can customize this in settings.py:
from datetime import timedelta

SIMPLE_JWT = {
    'ACCESS_TOKEN_LIFETIME': timedelta(minutes=30),
    'REFRESH_TOKEN_LIFETIME': timedelta(days=7),
}
- User logs in → gets 30-min access token + 7-day refresh token.
- After 30 minutes, the access token expires.
- Client silently uses the refresh token to request a new one.
- After 7 days, the refresh token expires → user must log in again.
This gives users a better balance between security and usability.
Refresh Token Rotation (Optional, but Recommended)
You can enable refresh token rotation:
- Every time a refresh token is used, issue a new one.
- The old refresh token becomes invalid.
- Prevents token reuse attacks if a refresh token is stolen.
Enable with SimpleJWT settings:
SIMPLE_JWT = {
    "ROTATE_REFRESH_TOKENS": True,
    "BLACKLIST_AFTER_ROTATION": True,
}
With this:
- User refreshes → gets a new access + refresh token.
- The old refresh token is blacklisted (cannot be reused).
Step 7 – Advanced Usage (Custom Claims & Blacklisting)
1. Add Custom Claims to JWT
By default, SimpleJWT tokens include:
{
  "token_type": "access",
  "exp": 1700000000,
  "jti": "unique-id",
  "user_id": 1
}
That works, but often we need extra info (e.g., user’s email, role, verified status).
Inside your Django app modify serializers.py to add the CustomTokenObtainPairSerializer:
from rest_framework_simplejwt.serializers import TokenObtainPairSerializer

class CustomTokenObtainPairSerializer(TokenObtainPairSerializer):
    @classmethod
    def get_token(cls, user):
        token = super().get_token(user)
        # Add custom claims
        token['email'] = user.email
        token['role'] = 'admin' if user.is_staff else 'user'
        return token
Then we connect the serializer to a view:
from rest_framework_simplejwt.views import TokenObtainPairView
from .serializers import CustomTokenObtainPairSerializer

class CustomTokenObtainPairView(TokenObtainPairView):
    serializer_class = CustomTokenObtainPairSerializer
Next, point your login endpoint to this new view instead of the default:
...
from blog.views import CustomTokenObtainPairView
urlpatterns = [
path('api/token/', CustomTokenObtainPairView.as_view(), name='token_obtain_pair'),
...
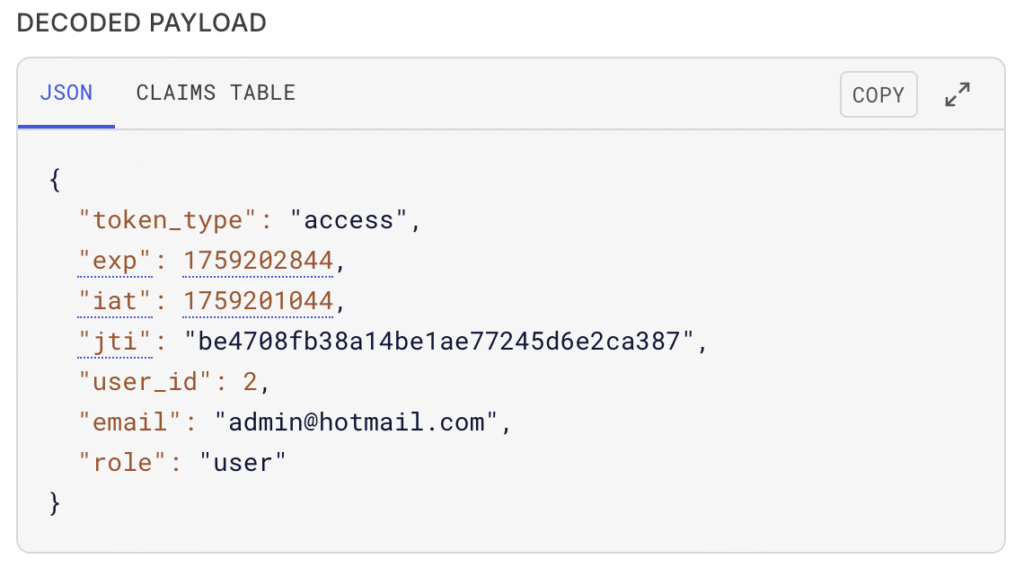
]Now a decoded JWT might look like this:
{
  "token_type": "access",
  "exp": 1700000000,
  "user_id": 1,
  "email": "admin@example.com",
  "role": "admin"
}
2. JWT Logout with Token Blacklisting in Django
One common question:
“If JWTs are stateless, how do we log out?”
The answer is blacklisting.
Step 1: Install the extension
pip install djangorestframework-simplejwt[blacklist]
Step 2: Enable in INSTALLED_APPS
INSTALLED_APPS = [
    ...
    'rest_framework_simplejwt.token_blacklist',
]
Step 3: Configure Settings
SIMPLE_JWT = {
    "ROTATE_REFRESH_TOKENS": True,
    "BLACKLIST_AFTER_ROTATION": True,
}
ROTATE_REFRESH_TOKENS=True→ Every time a refresh token is used, issue a new one.BLACKLIST_AFTER_ROTATION=True→ Old refresh tokens are invalidated (blacklisted).
Step 4: Use Blacklisting in Logout
You can create a logout endpoint that blacklists the user’s refresh token:
from rest_framework_simplejwt.tokens import RefreshToken
from rest_framework.response import Response
from rest_framework.decorators import api_view, permission_classes
from rest_framework.permissions import IsAuthenticated

@api_view(['POST'])
@permission_classes([IsAuthenticated])
def logout_view(request):
    try:
        refresh_token = request.data["refresh"]
        token = RefreshToken(refresh_token)
        token.blacklist()
        return Response({"detail": "Logout successful."})
    except Exception as e:
        return Response({"error": str(e)}, status=400)
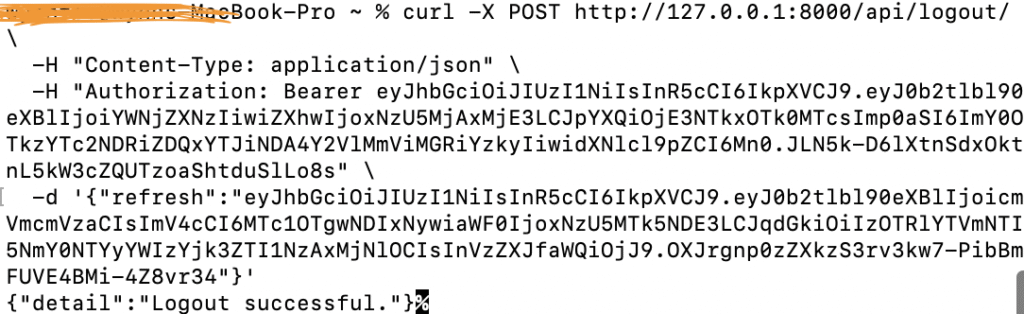
Now when a user logs out, their refresh token is blacklisted and can’t be used again
curl -X POST http://127.0.0.1:8000/api/logout/ \
  -H "Content-Type: application/json" \
  -H "Authorization: Bearer <your_access_token>" \
  -d '{"refresh":"<your_refresh_token>"}'
Why Blacklisting Matters
Without blacklisting:
- Tokens remain valid until they expire.
- If someone steals your refresh token, they can keep generating new access tokens.
With blacklisting:
- Refresh tokens can be revoked immediately.
- Logout actually invalidates sessions.
👉 This makes your JWT setup behave more like traditional sessions, but with scalability benefits.
Automated Testing for JWT Authentication
To make sure your JWT setup works across changes, write unit tests.
# tests/test_jwt_auth.py
from rest_framework.test import APITestCase
from django.contrib.auth.models import User

class JWTAuthTests(APITestCase):
    def setUp(self):
        self.user = User.objects.create_user(username="tester", password="password123")

    def test_login_refresh_logout(self):
        # Login
        response = self.client.post("/api/token/", {"username": "tester", "password": "password123"})
        self.assertEqual(response.status_code, 200)
        access = response.data["access"]
        refresh = response.data["refresh"]

        # Access protected API
        response = self.client.get("/api/protected/", HTTP_AUTHORIZATION=f"Bearer {access}")
        self.assertEqual(response.status_code, 200)

        # Refresh access token
        response = self.client.post("/api/token/refresh/", {"refresh": refresh})
        self.assertEqual(response.status_code, 200)
        new_access = response.data["access"]

        # Logout (blacklist refresh token)
        response = self.client.post("/api/logout/", {"refresh": refresh}, HTTP_AUTHORIZATION=f"Bearer {new_access}")
        self.assertEqual(response.status_code, 200)

        # Try refreshing with blacklisted token
        response = self.client.post("/api/token/refresh/", {"refresh": refresh})
        self.assertEqual(response.status_code, 401)  # blacklisted
Run tests:
python manage.py testThis ensures login, refresh, and logout work correctly.
FAQs on Django JWT Authentication
What is the difference between access and refresh tokens?
- Access token → short-lived, used in API calls.
- Refresh token → long-lived, used to get new access tokens.
- Use HttpOnly cookies if possible (prevents XSS).
- If using localStorage, protect against XSS carefully.
How do I logout with JWT?
- Use token blacklisting (invalidate refresh tokens).
- Or let access tokens expire naturally.
Can I use JWT with Django sessions?
Yes, but it defeats the purpose. JWT is stateless; sessions are stateful. Pick one depending on your needs.
Conclusion
In this guide, we implemented JWT authentication in Django REST Framework using SimpleJWT. We set up access and refresh tokens, configured token lifetimes, added permissions, created custom claims, and implemented logout with token blacklisting. Unlike traditional sessions, JWT in Django provides a stateless, scalable authentication system that works across web and mobile applications. If you’re building APIs, this Django SimpleJWT showed how JWT login, refresh tokens, API permissions, and logout with token blacklisting create a secure authentication flow.
A full source code can be found on GitHub.