Laravel S3 File Upload Tutorial: AWS Cloud Storage Integration with Photo Gallery Example
So we got this Laravel app and users keep uploading photos, documents, videos. The server storage getting full like crazy and hosting bills going up. Plus when the site gets more traffic, the server slow down because serving files also uses up resources.
Contents
- 1 Laravel S3 File Upload
- 2 Step 1: Setting Up Your Laravel Project
- 3 Step 2: Create AWS S3 Bucket
- 4 Step 3: Create IAM User for Laravel
- 5 Step 4: Configure Laravel Environment
- 6 Step 5: Database Schema Design for Photo Metadata
- 7 Step 6: Photo Model with S3 Integration Methods
- 8 Step 7: PhotoController Implementation with Error Handling
- 9 Step 8: Create Routes
- 10 Step 9: Create Views
- 11 Step 10: Test Your Application
- 12 S3 Connection Testing with Tinker
- 13 Production Deployment with AWS Elastic Beanstalk and IAM Roles
- 14 Update AWS SDK Configuration
Laravel S3 File Upload
In this tutorial, we’re going to integrate AWS S3 with Laravel app to store all the files. We’ll build a simple photo gallery app where users can upload photos and view them. All these photos will be stored in AWS S3, not on our server. The app will have:
- Photo upload form
- Photo gallery to display all uploaded photos
- Delete photos function
Step 1: Setting Up Your Laravel Project
First, create a new Laravel s3 file storage project or use existing one:
composer create-project laravel/laravel cafe-gallery
cd cafe-gallery
Install the AWS SDK for PHP. Laravel uses this to talk to AWS services:
composer require league/flysystem-aws-s3-v3Step 2: Create AWS S3 Bucket
Creating a properly configured S3 bucket is crucial for serving files to web users while maintaining security best practices.
Creating Your S3 Bucket
- Navigate to AWS S3 Console
- Click “Create bucket”
- Configure these essential settings:
Bucket Configuration:
- Name:
cafe-gallery-photos-2025(globally unique) - Region:
ap-southeast-1(Singapore – optimize for your user base) - Public Access: Uncheck “Block all public access” for photo visibility
- Versioning: Disabled (reduces storage costs)
- Encryption: Enable SSE-S3 for data protection
Setting Bucket Policy for Public Read Access
After creating, go to your bucket permissions and add this bucket policy so people can view the uploaded photos:
{
    "Version": "2012-10-17",
    "Statement": [
        {
            "Effect": "Allow",
            "Principal": "*",
            "Action": "s3:GetObject",
            "Resource": "arn:aws:s3:::cafe-gallery-photos-2025/*"
        }
    ]
}
This policy grants public read-only access to uploaded files while maintaining security by preventing unauthorized uploads or deletions.
Step 3: Create IAM User for Laravel
We need to create a special user account for our Laravel app to access S3. Go to IAM service in AWS console.
User Configuration:
- Console access: Disabled (security best practice)
- Username:
laravel-s3-user - Access type: Programmatic access only
Create a least-privilege policy that grants only necessary S3 permissions:
{
    "Version": "2012-10-17",
    "Statement": [
        {
            "Effect": "Allow",
            "Action": [
                "s3:ListBucket",
                "s3:GetBucketLocation",
                "s3:ListAllMyBuckets"
            ],
            "Resource": "*"
        },
        {
            "Effect": "Allow",
            "Action": [
                "s3:GetObject",
                "s3:PutObject",
                "s3:DeleteObject",
                "s3:PutObjectAcl"
            ],
            "Resource": [
                "arn:aws:s3:::cafe-gallery-photos-2025",
                "arn:aws:s3:::cafe-gallery-photos-2025/*"
            ]
        }
    ]
}s3:ListAllMyBuckets– Required for basic S3 operationss3:GetBucketLocation– Needed for region verifications3:PutObjectAcl– Required when you use the ‘public’ parameter inStorage::put()
After creating the user, save the Access Key ID and Secret Access Key. You only see this once!
Step 4: Configure Laravel Environment
Open your .env file and add these AWS settings:
AWS_ACCESS_KEY_ID=your_access_key_here
AWS_SECRET_ACCESS_KEY=your_secret_key_here
AWS_DEFAULT_REGION=ap-southeast-1
AWS_BUCKET=cafe-gallery-photos-2025
AWS_USE_PATH_STYLE_ENDPOINT=false

FILESYSTEM_DISK=s3
The FILESYSTEM_DISK=s3 tells Laravel to use S3 by default for file storage.
Now open config/filesystems.php and check that your S3 configuration looks like this:
's3' => [
    'driver' => 's3',
    'key' => env('AWS_ACCESS_KEY_ID'),
    'secret' => env('AWS_SECRET_ACCESS_KEY'),
    'region' => env('AWS_DEFAULT_REGION'),
    'bucket' => env('AWS_BUCKET'),
    'url' => env('AWS_URL'),
    'endpoint' => env('AWS_ENDPOINT'),
    'use_path_style_endpoint' => env('AWS_USE_PATH_STYLE_ENDPOINT', false),
    'throw' => false,
],
This configuration enables Laravel’s Storage facade to automatically handle AWS authentication and bucket operations.
Step 5: Database Schema Design for Photo Metadata
We need a database table to store photo information. The actual photo files go to S3, but we keep track of them in our database.
php artisan make:migration create_photos_tableEdit the migration file:
<?php

use Illuminate\Database\Migrations\Migration;
use Illuminate\Database\Schema\Blueprint;
use Illuminate\Support\Facades\Schema;

return new class extends Migration
{
    public function up()
    {
        Schema::create('photos', function (Blueprint $table) {
            $table->id();
            $table->string('title');
            $table->string('filename');
            $table->string('s3_path');
            $table->string('s3_url');
            $table->integer('file_size');
            $table->string('mime_type');
            $table->timestamps();
        });
    }

    public function down()
    {
        Schema::dropIfExists('photos');
    }
};
Execute the migration to create your database table:
php artisan migrateStep 6: Photo Model with S3 Integration Methods
The Photo model provides an elegant interface for managing both database records and their corresponding S3 files:
php artisan make:model PhotoEdit app/Models/Photo.php:
<?php

namespace App\Models;

use Illuminate\Database\Eloquent\Model;
use Illuminate\Support\Facades\Storage;

class Photo extends Model
{
    protected $fillable = [
        'title',
        'filename',
        's3_path',
        's3_url',
        'file_size',
        'mime_type'
    ];

    public function deleteFromS3()
    {
        if ($this->s3_path) {
            Storage::disk('s3')->delete($this->s3_path);
        }
    }

    public function getFormattedSizeAttribute()
    {
        $bytes = $this->file_size;
        if ($bytes >= 1048576) {
            return number_format($bytes / 1048576, 2) . ' MB';
        } elseif ($bytes >= 1024) {
            return number_format($bytes / 1024, 2) . ' KB';
        } else {
            return $bytes . ' B';
        }
    }
}
The model encapsulates S3 operations and provides computed attributes for enhanced user experience while maintaining clean separation of concerns.
Step 7: PhotoController Implementation with Error Handling
Next, we create a PhotoController to handle the file uploads, validates input, manages S3 operations, and provides comprehensive error handling for production reliability.
php artisan make:controller PhotoControllerEdit app/Http/Controllers/PhotoController.php:
<?php

namespace App\Http\Controllers;

use App\Models\Photo;
use Illuminate\Http\Request;
use Illuminate\Support\Facades\Storage;
use Illuminate\Support\Str;

class PhotoController extends Controller
{
    public function index()
    {
        $photos = Photo::latest()->paginate(12);
        return view('photos.index', compact('photos'));
    }

    public function create()
    {
        return view('photos.create');
    }

    public function store(Request $request)
    {
        \Log::info('=== Photo Upload Started ===');

        $request->validate([
            'title' => 'required|string|max:255',
            'photo' => 'required|image|mimes:jpeg,png,jpg,gif|max:2048'
        ]);

        $uploadedFile = $request->file('photo');

        $filename = $uploadedFile->getClientOriginalName();
        $extension = $uploadedFile->getClientOriginalExtension();
        $filenameWithoutExtension = pathinfo($filename, PATHINFO_FILENAME);
        $uniqueFilename = Str::slug($filenameWithoutExtension) . '-' . uniqid() . '.' . $extension;

        $s3Path = 'photos/' . date('Y') . '/' . date('m') . '/' . $uniqueFilename;

        try {
            $s3Disk = Storage::disk('s3');
            $fileContents = file_get_contents($uploadedFile->getRealPath());

            \Log::info('Attempting S3 upload', [
                'path' => $s3Path,
                'file_size' => strlen($fileContents)
            ]);

            $uploadResult = $s3Disk->put($s3Path, $fileContents, [
                'ContentType' => $uploadedFile->getMimeType()
            ]);

            \Log::info('S3 put result:', ['result' => $uploadResult]);

            if (!$uploadResult) {
                throw new \Exception('S3 put method returned false');
            }

            if (!$s3Disk->exists($s3Path)) {
                throw new \Exception('File verification failed - not found in S3');
            }

            $s3Url = $s3Disk->url($s3Path);

            Photo::create([
                'title' => $request->title,
                'filename' => $filename,
                's3_path' => $s3Path,
                's3_url' => $s3Url,
                'file_size' => $uploadedFile->getSize(),
                'mime_type' => $uploadedFile->getMimeType()
            ]);

            \Log::info('Photo saved successfully');

            return redirect()->route('photos.index')->with('success', 'Photo uploaded successfully!');

        } catch (\Aws\Exception\AwsException $e) {
            \Log::error('AWS Exception:', [
                'error_code' => $e->getAwsErrorCode(),
                'error_message' => $e->getAwsErrorMessage(),
                'status_code' => $e->getStatusCode()
            ]);

            return back()->with('error', 'AWS Error: ' . $e->getAwsErrorMessage())->withInput();

        } catch (\Exception $e) {
            \Log::error('General upload error:', [
                'message' => $e->getMessage(),
                'file' => $e->getFile(),
                'line' => $e->getLine()
            ]);

            return back()->with('error', 'Upload failed: ' . $e->getMessage())->withInput();
        }
    }

    public function show(Photo $photo)
    {
        return view('photos.show', compact('photo'));
    }

    public function destroy(Photo $photo)
    {
        try {
            $photo->deleteFromS3();
            $photo->delete();

            return redirect()->route('photos.index')->with('success', 'Photo deleted successfully!');

        } catch (\Exception $e) {
            return back()->with('error', 'Failed to delete photo: ' . $e->getMessage());
        }
    }
}
This controller includes features like unique filename generation, organized S3 storage structure, and atomic operations that maintain data consistency.
Step 8: Create Routes
Edit routes/web.php:
<?php

use App\Http\Controllers\PhotoController;
use Illuminate\Support\Facades\Route;

Route::get('/', [PhotoController::class, 'index'])->name('photos.index');
Route::get('/photos/create', [PhotoController::class, 'create'])->name('photos.create');
Route::post('/photos', [PhotoController::class, 'store'])->name('photos.store');
Route::get('/photos/{photo}', [PhotoController::class, 'show'])->name('photos.show');
Route::delete('/photos/{photo}', [PhotoController::class, 'destroy'])->name('photos.destroy');
Step 9: Create Views
Base Layout Template
Create the directory structure and main layout::
mkdir -p resources/views/photos
mkdir -p resources/views/layouts
Create resources/views/layouts/app.blade.php:
<!DOCTYPE html>
<html lang="en">
<head>
    <meta charset="UTF-8">
    <meta name="viewport" content="width=device-width, initial-scale=1.0">
    <title>{{ $title ?? 'Café Gallery' }}</title>
    <link href="https://cdn.jsdelivr.net/npm/bootstrap@5.3.0/dist/css/bootstrap.min.css" rel="stylesheet">
    <style>
        .photo-card {
            transition: transform 0.2s;
        }
        .photo-card:hover {
            transform: translateY(-5px);
        }
    </style>
</head>
<body>
    <nav class="navbar navbar-expand-lg navbar-dark bg-dark">
        <div class="container">
            <a class="navbar-brand" href="{{ route('photos.index') }}">Café Gallery</a>
            <a class="btn btn-outline-light" href="{{ route('photos.create') }}">Upload Photo</a>
        </div>
    </nav>

    <div class="container mt-4">
        @if (session('success'))
            <div class="alert alert-success alert-dismissible fade show" role="alert">
                {{ session('success') }}
                <button type="button" class="btn-close" data-bs-dismiss="alert"></button>
            </div>
        @endif

        @if (session('error'))
            <div class="alert alert-danger alert-dismissible fade show" role="alert">
                {{ session('error') }}
                <button type="button" class="btn-close" data-bs-dismiss="alert"></button>
            </div>
        @endif

        @yield('content')
    </div>

    <script src="https://cdn.jsdelivr.net/npm/bootstrap@5.3.0/dist/js/bootstrap.bundle.min.js"></script>
</body>
</html>
Photo Gallery Index View
Create resources/views/photos/index.blade.php:
@extends('layouts.app')

@section('content')
<div class="d-flex justify-content-between align-items-center mb-4">
    <h1>Café Photo Gallery</h1>
    <a href="{{ route('photos.create') }}" class="btn btn-primary">Upload New Photo</a>
</div>

@if ($photos->count() > 0)
    <div class="row">
        @foreach ($photos as $photo)
            <div class="col-md-4 mb-4">
                <div class="card photo-card h-100">
                    <img src="{{ $photo->s3_url }}" class="card-img-top" alt="{{ $photo->title }}" style="height: 250px; object-fit: cover;">
                    <div class="card-body d-flex flex-column">
                        <h5 class="card-title">{{ $photo->title }}</h5>
                        <p class="card-text text-muted small">
                            Size: {{ $photo->formatted_size }}<br>
                            Uploaded: {{ $photo->created_at->diffForHumans() }}
                        </p>
                        <div class="mt-auto">
                            <a href="{{ route('photos.show', $photo) }}" class="btn btn-sm btn-outline-primary">View</a>
                            <form action="{{ route('photos.destroy', $photo) }}" method="POST" class="d-inline" onsubmit="return confirm('Sure you want to delete this photo?')">
                                @csrf
                                @method('DELETE')
                                <button type="submit" class="btn btn-sm btn-outline-danger">Delete</button>
                            </form>
                        </div>
                    </div>
                </div>
            </div>
        @endforeach
    </div>

    {{ $photos->links() }}
@else
    <div class="text-center">
        <h3>No photos yet</h3>
        <p>Be the first to upload a photo of your delicious meal!</p>
        <a href="{{ route('photos.create') }}" class="btn btn-primary">Upload First Photo</a>
    </div>
@endif
@endsection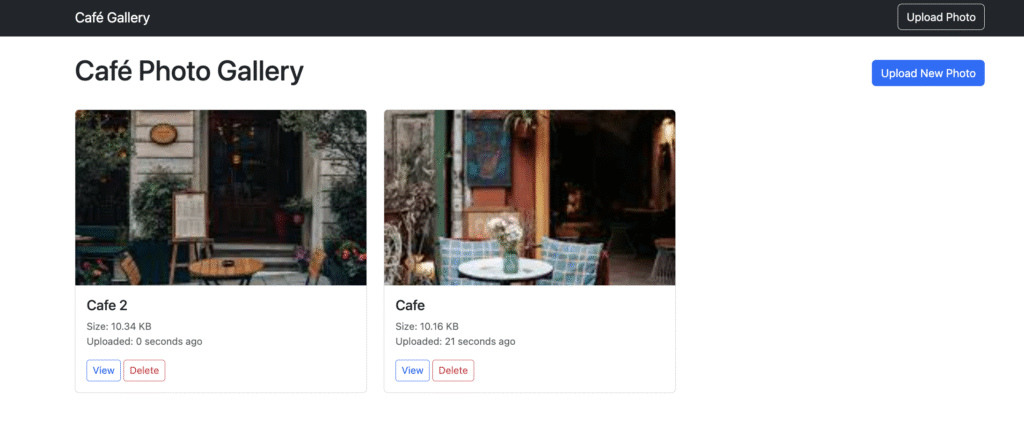
Photo Upload Form
Create resources/views/photos/create.blade.php:
@extends('layouts.app')

@section('content')
<div class="row justify-content-center">
    <div class="col-md-8">
        <div class="card">
            <div class="card-header">
                <h4>Upload New Photo</h4>
            </div>
            <div class="card-body">
                <form action="{{ route('photos.store') }}" method="POST" enctype="multipart/form-data">
                    @csrf

                    <div class="mb-3">
                        <label for="title" class="form-label">Photo Title</label>
                        <input type="text" class="form-control @error('title') is-invalid @enderror"
                               id="title" name="title" value="{{ old('title') }}"
                               placeholder="e.g., Delicious Laksa Bowl">
                        @error('title')
                            <div class="invalid-feedback">{{ $message }}</div>
                        @enderror
                    </div>

                    <div class="mb-3">
                        <label for="photo" class="form-label">Choose Photo</label>
                        <input type="file" class="form-control @error('photo') is-invalid @enderror"
                               id="photo" name="photo" accept="image/*">
                        <div class="form-text">Maximum file size: 5MB. Supported formats: JPEG, PNG, JPG, GIF</div>
                        @error('photo')
                            <div class="invalid-feedback">{{ $message }}</div>
                        @enderror
                    </div>

                    <div class="mb-3">
                        <img id="preview" src="" alt="Preview" style="max-width: 300px; max-height: 200px; display: none;" class="img-fluid rounded">
                    </div>

                    <div class="d-grid gap-2 d-md-flex justify-content-md-end">
                        <a href="{{ route('photos.index') }}" class="btn btn-secondary">Cancel</a>
                        <button type="submit" class="btn btn-primary">Upload Photo</button>
                    </div>
                </form>
            </div>
        </div>
    </div>
</div>

<script>
document.getElementById('photo').addEventListener('change', function(e) {
    const file = e.target.files[0];
    const preview = document.getElementById('preview');

    if (file) {
        const reader = new FileReader();
        reader.onload = function(e) {
            preview.src = e.target.result;
            preview.style.display = 'block';
        };
        reader.readAsDataURL(file);
    } else {
        preview.style.display = 'none';
    }
});
</script>
@endsection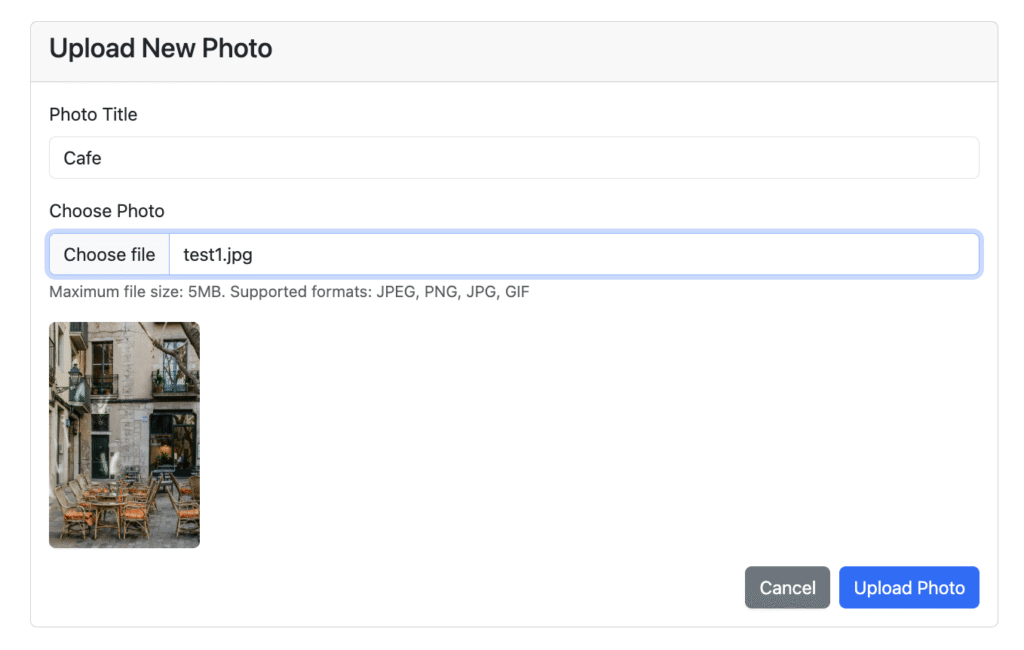
Individual Photo View
Create resources/views/photos/show.blade.php:
@extends('layouts.app')

@section('content')
<div class="row justify-content-center">
    <div class="col-md-10">
        <div class="card">
            <div class="card-header d-flex justify-content-between align-items-center">
                <h4>{{ $photo->title }}</h4>
                <div>
                    <a href="{{ route('photos.index') }}" class="btn btn-secondary">Back to Gallery</a>
                    <form action="{{ route('photos.destroy', $photo) }}" method="POST" class="d-inline" onsubmit="return confirm('Sure you want to delete this photo?')">
                        @csrf
                        @method('DELETE')
                        <button type="submit" class="btn btn-danger">Delete</button>
                    </form>
                </div>
            </div>
            <div class="card-body text-center">
                <img src="{{ $photo->s3_url }}" alt="{{ $photo->title }}" class="img-fluid rounded shadow-lg" style="max-height: 80vh;">

                <div class="mt-4 text-muted">
                    <p><strong>Original filename:</strong> {{ $photo->filename }}</p>
                    <p><strong>File size:</strong> {{ $photo->formatted_size }}</p>
                    <p><strong>Uploaded:</strong> {{ $photo->created_at->format('j F Y, g:i A') }}</p>
                    <p><strong>Direct S3 URL:</strong> <a href="{{ $photo->s3_url }}" target="_blank">{{ $photo->s3_url }}</a></p>
                </div>
            </div>
        </div>
    </div>
</div>
@endsection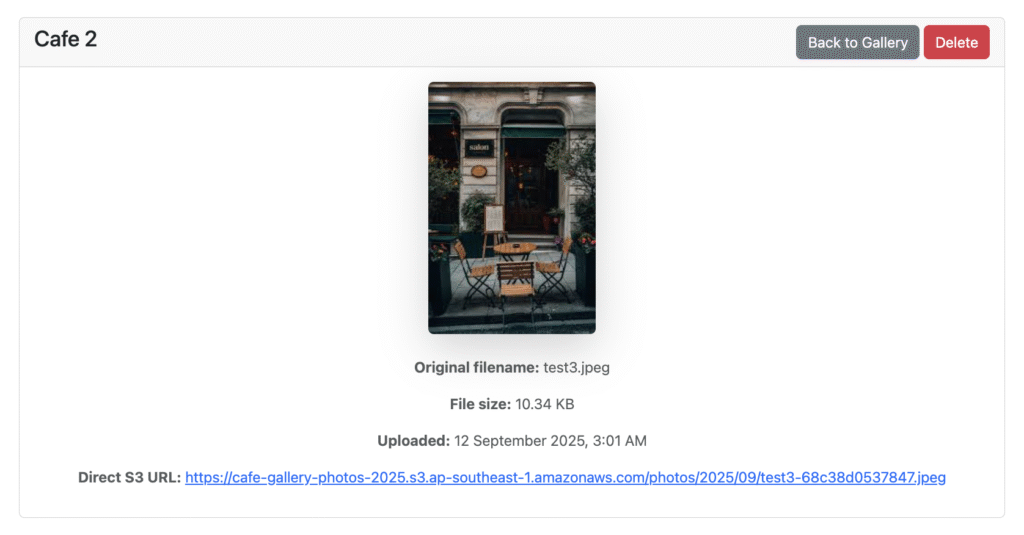
Step 10: Test Your Application
Start your Laravel development server:
php artisan serveVisit http://localhost:8000 and test the following:
- Upload functionality: Visit
http://localhost:8000/photos/createand upload various image formats - S3 storage verification: Check your AWS S3 bucket for uploaded files
- Gallery display: Ensure photos load correctly from S3 URLs
- Individual photo view: Test full-size image display and metadata
- Delete functionality: Verify files are removed from both database and S3
S3 Connection Testing with Tinker
Create a simple test to make sure everything is working. Run this in php artisan tinker:
use Illuminate\Support\Facades\Storage;

Storage::disk('s3')->put('test.txt', 'Hello from Laravel!');
Storage::disk('s3')->exists('test.txt');
Storage::disk('s3')->get('test.txt');
Storage::disk('s3')->delete('test.txt');
If these commands work without errors, your S3 connection is working properly.
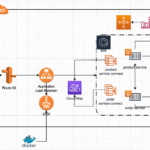
Production Deployment with AWS Elastic Beanstalk and IAM Roles
Deploying to production requires enhanced security through IAM roles, eliminating hardcoded credentials and providing automated scaling capabilities.
Why Use IAM Roles Instead of Access Keys?
Using IAM roles instead of hardcoded access keys is much more secure. No more worrying about accidentally committing secrets to Git or managing key rotation. AWS handles credential rotation automatically, and you get fine-grained access control without storing sensitive keys in environment variables.
Create IAM Role for EC2 Instances
Go to AWS IAM Console and click Roles, then Create Role. For trusted entity type, choose AWS service and select EC2. This role will allow your Elastic Beanstalk instances to access S3 without needing access keys.
Now we need to create a custom policy. Click “Create policy” and use the JSON editor to add this policy for S3 access:
{
    "Version": "2012-10-17",
    "Statement": [
        {
            "Effect": "Allow",
            "Action": [
                "s3:GetObject",
                "s3:PutObject",
                "s3:DeleteObject",
                "s3:ListBucket"
            ],
            "Resource": [
                "arn:aws:s3:::cafe-gallery-photos-2025",
                "arn:aws:s3:::cafe-gallery-photos-2025/*"
            ]
        }
    ]
}
Name this policy LaravelS3GalleryPolicy. After creating the policy, go back to your role creation and attach this policy along with these AWS managed policies: AWSElasticBeanstalkWebTier and AWSElasticBeanstalkWorkerTier.
Name your role cafe-gallery-ec2-role and finish creating it. AWS automatically creates an instance profile with the same name.
Prepare Laravel App for Production
We need to modify our Laravel app to work with IAM roles instead of access keys. Create a new .env.production file that removes the AWS keys since we won’t need them:
APP_NAME="Cafe Gallery"
APP_ENV=production
APP_KEY=base64:your_generated_key_here
APP_DEBUG=false
APP_URL=http://your-app.region.elasticbeanstalk.com

LOG_CHANNEL=stack
LOG_LEVEL=error

DB_CONNECTION=sqlite
DB_DATABASE=/var/app/current/database/database.sqlite

FILESYSTEM_DISK=s3
SESSION_DRIVER=file

# AWS Configuration - No keys needed with IAM roles!
AWS_DEFAULT_REGION=ap-southeast-1
AWS_BUCKET=cafe-gallery-photos-2025
AWS_USE_PATH_STYLE_ENDPOINT=false

# Remove these lines - not needed with IAM roles
# AWS_ACCESS_KEY_ID=
# AWS_SECRET_ACCESS_KEY=
Generate your production app key by running php artisan key:generate and copy the result to your .env.production file.
Update AWS SDK Configuration
We need to tell the AWS SDK to use IAM roles instead of environment credentials. Create a new config file at config/aws.php:
<?php

return [
    'credentials' => env('APP_ENV') === 'production' ? 'default' : [
        'key'    => env('AWS_ACCESS_KEY_ID'),
        'secret' => env('AWS_SECRET_ACCESS_KEY'),
    ],
    'region' => env('AWS_DEFAULT_REGION', 'ap-southeast-1'),
    'version' => 'latest',
];
Now update your config/filesystems.php to use this new configuration:
's3' => [
    'driver' => 's3',
    'key' => env('APP_ENV') === 'production' ? null : env('AWS_ACCESS_KEY_ID'),
    'secret' => env('APP_ENV') === 'production' ? null : env('AWS_SECRET_ACCESS_KEY'),
    'region' => env('AWS_DEFAULT_REGION'),
    'bucket' => env('AWS_BUCKET'),
    'url' => env('AWS_URL'),
    'endpoint' => env('AWS_ENDPOINT'),
    'use_path_style_endpoint' => env('AWS_USE_PATH_STYLE_ENDPOINT', false),
    'throw' => false,
],
When the app runs in production, it will automatically use the IAM role attached to the EC2 instance. In development, it still uses your access keys from the .env file.
Create Elastic Beanstalk Configuration
Create a .ebextensions directory in your project root. This is where we put configuration files for Elastic Beanstalk. Create .ebextensions/01-laravel.config:
option_settings:
  aws:elasticbeanstalk:container:php:
    document_root: /public
  aws:autoscaling:launchconfiguration:
    IamInstanceProfile: cafe-gallery-ec2-role
  aws:elasticbeanstalk:application:environment:
    COMPOSER_HOME: /root

commands:
  01_install_composer:
    command: |
      if [ ! -f /usr/local/bin/composer ]; then
        curl -sS https://getcomposer.org/installer | php
        mv composer.phar /usr/local/bin/composer
        chmod +x /usr/local/bin/composer
      fi

container_commands:
  01_composer_install:
    command: "composer install --no-dev --optimize-autoloader"
    cwd: "/var/app/staging"
  02_artisan_migrate:
    command: "php artisan migrate --force"
    cwd: "/var/app/staging"
  03_artisan_config_cache:
    command: "php artisan config:cache"
    cwd: "/var/app/staging"
  04_artisan_route_cache:
    command: "php artisan route:cache"
    cwd: "/var/app/staging"
  05_create_sqlite_db:
    command: "touch database/database.sqlite && chmod 664 database/database.sqlite"
    cwd: "/var/app/staging"
The important part is the IamInstanceProfile: cafe-gallery-ec2-role line which tells Elastic Beanstalk to use our IAM role.
Create another configuration file .ebextensions/02-storage.config for proper file permissions:
container_commands:
  01_storage_link:
    command: "php artisan storage:link"
    cwd: "/var/app/staging"
  02_fix_permissions:
    command: "chmod -R 775 storage bootstrap/cache"
    cwd: "/var/app/staging"
  03_fix_ownership:
    command: "chown -R webapp:webapp storage bootstrap/cache database"
    cwd: "/var/app/staging"
Laravel S3 Deployment Elastic Beanstalk
First, install the Elastic Beanstalk CLI.
- On macOS, use
brew install awsebcli. - On Windows or Linux, use
pip install awsebcli.
Initialize your Elastic Beanstalk application in your project root:
eb init cafe-gallerySelect your AWS region (ap-southeast-1 for Singapore), choose PHP as the platform, and select the latest PHP version available. When asked about SSH, say yes and select or create an EC2 key pair.
Create your environment:
eb create productionThis creates a new environment called “production”. Elastic Beanstalk will automatically upload your code, install dependencies, and start your Laravel application. The process takes about 5-10 minutes.
After deployment, check your application:
eb openThis opens your app in the browser. Test uploading a photo to make sure S3 integration works with the IAM role.
Set Up CI/CD Pipeline with GitHub Actions
Create .github/workflows/deploy.yml in your project root for automated deployments:
name: Deploy to AWS Elastic Beanstalk

on:
  push:
    branches: [ main ]
  pull_request:
    branches: [ main ]

jobs:
  deploy:
    runs-on: ubuntu-latest

    steps:
    - uses: actions/checkout@v3

    - name: Setup PHP
      uses: shivammathur/setup-php@v2
      with:
        php-version: '8.1'
        extensions: mbstring, xml, ctype, iconv, intl, pdo_sqlite, dom, filter, gd, iconv, json, mbstring, pdo

    - name: Cache Composer packages
      id: composer-cache
      uses: actions/cache@v3
      with:
        path: vendor
        key: ${{ runner.os }}-php-${{ hashFiles('**/composer.lock') }}
        restore-keys: |
          ${{ runner.os }}-php-

    - name: Install dependencies
      run: composer install --no-progress --no-suggest --prefer-dist --optimize-autoloader

    - name: Run tests
      run: php artisan test

    - name: Configure AWS credentials
      uses: aws-actions/configure-aws-credentials@v2
      with:
        aws-access-key-id: ${{ secrets.AWS_ACCESS_KEY_ID }}
        aws-secret-access-key: ${{ secrets.AWS_SECRET_ACCESS_KEY }}
        aws-region: ap-southeast-1

    - name: Deploy to Elastic Beanstalk
      run: |
        # Install EB CLI
        pip install awsebcli

        # Deploy only on main branch
        if [ "${{ github.ref }}" = "refs/heads/main" ]; then
          eb deploy production --staged
        fi
For this to work, you need to add AWS credentials to your GitHub repository secrets. Go to your GitHub repo Settings, then Secrets and variables, then Actions.
Add these secrets:
- AWS_ACCESS_KEY_ID: Your personal AWS access key (just for deployment)
- AWS_SECRET_ACCESS_KEY: Your personal AWS secret key (just for deployment)
Note that these are different from the IAM role we created earlier. The GitHub Actions needs credentials to deploy to Elastic Beanstalk, but your running application uses the IAM role for S3 access.
Create IAM User for GitHub Actions
Create a separate IAM user just for GitHub Actions deployments. Go to IAM and create a user called github-actions-deploy with programmatic access only.
Attach this custom policy to allow EB deployments:
{
    "Version": "2012-10-17",
    "Statement": [
        {
            "Effect": "Allow",
            "Action": [
                "elasticbeanstalk:*",
                "ec2:*",
                "s3:*",
                "autoscaling:*",
                "cloudformation:*",
                "logs:*"
            ],
            "Resource": "*"
        }
    ]
}
Use the access keys from this user in your GitHub secrets.
Environment-Specific Configuration
Create different environment files for staging and production. Add a .ebextensions/03-environment.config:
option_settings:
  aws:elasticbeanstalk:application:environment:
    APP_ENV: production
    APP_DEBUG: false
    LOG_LEVEL: error
    AWS_DEFAULT_REGION: ap-southeast-1
    AWS_BUCKET: cafe-gallery-photos-2025
    FILESYSTEM_DISK: s3
Now you can create different environments for staging and production:
eb create staging --cfg staging
eb create production --cfg production
Monitor and Troubleshoot
Use eb logs to see what’s happening during deployment:
eb logsFor real-time logs:
eb logs --allCheck your application health in the AWS Elastic Beanstalk console. If there are issues, the logs will usually tell you what’s wrong. Common issues include file permission problems or missing PHP extensions.
Test Your Production Environment
After deployment, test these key features:
- Visit your application URL and ensure it loads properly Upload a photo and verify it appears in your S3 bucket Check that photos display correctly from S3 URLs Test photo deletion to ensure S3 cleanup works Check that the database (SQLite) is working for storing photo metadata
- Your Laravel photo gallery should now be running on AWS Elastic Beanstalk with secure IAM role-based S3 access and automated CI/CD deployment!